 English
 русский
 Español
 Deutsch
To properly use a crankcase repair kit, start by identifying the source of the leak or failure, gather all components from the kit, clean and prepare all mating surfaces thoroughly, then replace seals, gaskets, and bearings in the correct sequence before torquing all fasteners to manufacturer specifications. Following this process correctly can restore engine sealing integrity and extend engine life by tens of thousands of miles, while avoiding common mistakes that lead to repeat failures or costly damage.
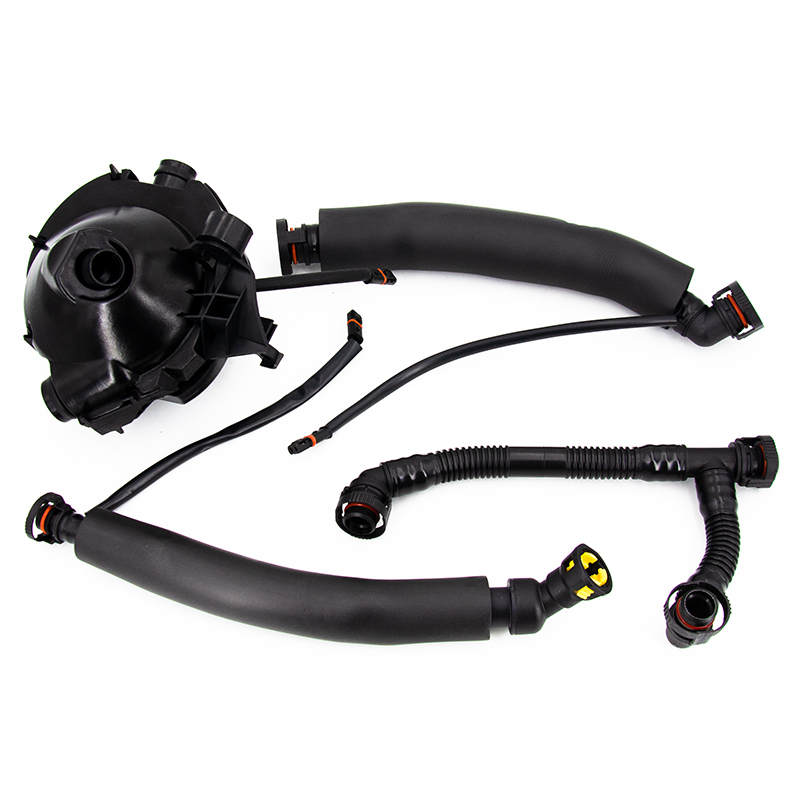
A crankcase repair kit typically contains seals, bearings, gaskets, covers, and bolts engineered specifically for your engine model. Each component plays a distinct role in preventing oil leaks, reducing internal friction, and maintaining compression. Understanding how to use every piece correctly is what separates a lasting repair from a temporary fix.
Content
- 1 What Is Included in a Crankcase Repair Kit
- 2 Tools and Preparations Required Before You Begin
- 3 Step-by-Step Process for Using a Crankcase Repair Kit
- 3.1 Step 1 — Disassemble and Inspect
- 3.2 Step 2 — Remove Old Seals, Gaskets, and Bearings
- 3.3 Step 3 — Clean and Prepare All Mating Surfaces
- 3.4 Step 4 — Install New Bearings
- 3.5 Step 5 — Install New Gaskets and O-Rings
- 3.6 Step 6 — Press In New Oil Seals
- 3.7 Step 7 — Reassemble and Torque to Specification
- 4 Common Mistakes That Cause Repair Failure
- 5 How to Select the Right Crankcase Repair Kit for Your Engine
- 6 Post-Repair Break-In and Verification
- 7 When to Replace vs. Rebuild the Crankcase
- 8 Maintenance Tips to Extend the Life of Your Repair
What Is Included in a Crankcase Repair Kit
Before starting any repair, it is essential to understand what your kit contains and what each part does. Kits vary by engine type and application, but most comprehensive crankcase repair kits include the following core components:
| Component | Function | Replacement Priority |
|---|---|---|
| Crankshaft Oil Seals | Prevent oil from leaking at the front and rear crankshaft exits | Always replace |
| Main Bearings | Support the crankshaft and reduce friction during rotation | Replace if worn or noisy |
| Crankcase Gaskets | Seal mating surfaces between the crankcase halves or block | Always replace |
| Crankcase Cover Bolts | Fasten crankcase covers and maintain clamping pressure on gaskets | Replace if stripped or corroded |
| O-rings | Provide secondary sealing at ports, plugs, and sensor fittings | Always replace |
| Crankcase Covers | Enclose the crankcase cavity and protect internal components | Replace if cracked or warped |
Always cross-reference the kit's part list against your engine's service manual before beginning. Using an incompatible seal diameter or bearing clearance — even by as little as 0.01 mm — can cause premature failure or oil bypass.
Tools and Preparations Required Before You Begin
Proper preparation is responsible for at least 50% of a successful repair outcome. Rushing into disassembly without the right tools or a clean workspace is one of the most common causes of repair failure. Gather everything listed below before touching the engine.
Essential Tools
- Torque wrench (capable of reading in both Newton-meters and foot-pounds)
- Seal driver set or suitable socket for pressing seals flush
- Bearing puller and press
- Gasket scraper and plastic or brass razor (never steel on aluminum)
- Feeler gauges for checking bearing clearances
- Cleaning solvent and lint-free shop cloths
- Engine assembly lubricant or clean engine oil for pre-lubricating new parts
- Micrometer or dial bore gauge for measuring crankshaft and bore dimensions
- Service manual with torque specifications and clearance values for your specific engine
Workspace and Safety Preparation
Drain the engine oil completely and allow the engine to cool to room temperature before starting. Even a small amount of residual oil on a mating surface can prevent a gasket from sealing correctly. Work in a clean, well-lit environment and use an engine stand whenever possible to allow full access to all crankcase surfaces.
Label and bag all removed bolts and hardware by location. Crankcase bolts often vary in length by position, and installing a longer bolt in a shallow hole can crack the housing.
Step-by-Step Process for Using a Crankcase Repair Kit
Follow these steps carefully and in order. Skipping steps or reversing the sequence is a frequent cause of repeat failures, particularly when it comes to surface preparation and torquing.
Step 1 — Disassemble and Inspect
Remove the crankcase covers, pan, or split halves according to your engine's service manual. As you disassemble, inspect each component for signs of damage beyond normal wear: cracks in the crankcase housing, scoring on the bearing journals, or corrosion on mating surfaces. These issues must be addressed before installing any new kit parts.
Measure the crankshaft main journal diameters with a micrometer. Compare these readings to the service manual specifications. If journals are worn beyond the allowable limit (typically more than 0.03–0.05 mm out of round), the crankshaft must be reground or replaced before new bearings will seat properly.
Step 2 — Remove Old Seals, Gaskets, and Bearings
Use a seal puller or flat-blade screwdriver (with the tip wrapped in tape to protect the housing) to extract old oil seals. Never drive seals out from behind with a punch, as this can distort the seal housing bore. For crankshaft main bearings, use a proper bearing puller to avoid damaging the crankcase bore.
Peel off all old gasket material using a plastic scraper. On aluminum surfaces, be especially cautious — scratches as shallow as 0.1 mm can prevent a new gasket from sealing. Finish with a solvent wipe to remove all oil film and debris.
Step 3 — Clean and Prepare All Mating Surfaces
This is the most frequently skipped and most critical step. Apply a dedicated gasket removal solvent and allow it to dwell for several minutes before wiping. Repeat until the surface is completely free of old gasket material, sealant, carbon deposits, and oil residue. Finish with a lint-free cloth dampened with isopropyl alcohol.
Run a straightedge across the mating surface in multiple directions to check for warpage. Warpage exceeding 0.05 mm on most gasket surfaces requires resurfacing at a machine shop before a new gasket will seal reliably.
Step 4 — Install New Bearings
Lay the new main bearing shells into the crankcase saddles and bearing caps. Apply a light coat of clean engine oil or engine assembly lubricant to the bearing surface — never to the back of the shell. The back of the bearing must remain dry to seat properly against the housing.
Use Plastigage to verify bearing clearance after placing the crankshaft. Typical main bearing oil clearance is 0.025 to 0.065 mm depending on the engine. Clearance outside this range will cause either oil starvation (too tight) or low oil pressure (too loose).
Step 5 — Install New Gaskets and O-Rings
Position new gaskets dry unless the service manual specifies a thin bead of sealant at specific locations such as corners or water jacket passages. When sealant is called for, apply only the specified type in a continuous bead approximately 2–3 mm in diameter. Thicker beads of sealant can squeeze into the engine and block oil galleries.
Lubricate all O-rings with clean oil or a compatible rubber-safe grease before installation. Dry O-rings tear easily when twisted into position and may not seal even if they appear seated correctly.
Step 6 — Press In New Oil Seals
Lightly lubricate the outer diameter of each new seal with clean oil before installation. Use a seal driver or socket that matches the outer diameter of the seal exactly. Press the seal in squarely and evenly until it sits flush with the housing bore or at the depth specified in the service manual. A cocked or recessed seal will leak immediately, even under low pressure conditions.
Lightly coat the seal lip with engine oil to protect it during the initial startup before oil pressure builds fully.
Step 7 — Reassemble and Torque to Specification
Reinstall crankcase covers and components in the reverse order of disassembly. Always use the torque sequence specified in the service manual — typically working from the center outward in a cross or star pattern. Torque all fasteners in two or three progressive stages rather than going to full torque in one pass. For example, if the specification is 25 Nm, torque to 10 Nm first, then 18 Nm, then the final 25 Nm.
If the kit includes new bolts with pre-applied thread locking compound (indicated by a colored patch on the threads), do not add additional sealant and do not reuse the old bolts, as the compound activates only once.
Common Mistakes That Cause Repair Failure
Even with a high-quality kit, these errors account for the majority of repeat crankcase oil leaks and bearing failures after a DIY or shop repair:
- Inadequate surface cleaning: Residual oil, old sealant, or gasket material prevents new gaskets from conforming to the surface and sealing under pressure.
- Installing seals without a driver: Hand-pressing or hammering seals directly causes them to tilt and allows oil to bypass around the outside of the seal housing.
- Skipping bearing clearance verification: Assuming bearings fit correctly without measuring can result in oil starvation within the first few minutes of startup.
- Over-torquing fasteners: Excessive torque crushes gaskets beyond their designed compression point, causing them to extrude out from between mating surfaces and lose their seal.
- Applying too much sealant: Excess sealant squeezes into the engine interior and can block small oil passages, leading to lubrication failure.
- Reusing stretch bolts or torque-to-yield fasteners: These bolts are designed to be used only once. Reusing them reduces clamping force and leads to gasket failure.
- Not waiting for sealant to cure: Many silicone-based sealants require a cure time of 30 minutes to 1 hour before the engine is started. Starting the engine too soon can push uncured sealant into oil passages.
How to Select the Right Crankcase Repair Kit for Your Engine
Not all crankcase repair kits are interchangeable. Selecting the wrong kit wastes time and risks damage. Use the following criteria to identify the correct kit for your application:
- Engine make, model, and displacement: Crankcase geometry and seal dimensions vary significantly even between engines of similar displacement from the same manufacturer. Always match the kit to the exact engine code, not just the vehicle model year.
- Bearing size classification: Main bearings are typically available in standard size and undersize (e.g., 0.25 mm, 0.50 mm undersize) to accommodate crankshafts that have been reground. Verify whether your crankshaft has been previously reground before ordering.
- Gasket material: High-performance or turbocharged engines typically require multi-layer steel (MLS) gaskets or reinforced composite gaskets. Standard fiber or rubber gaskets are not designed to withstand the higher temperatures and pressures in these applications.
- Seal material compatibility: Engines that use synthetic oil require seals rated for compatibility with fully synthetic lubricants. Some older nitrile rubber seals degrade rapidly when exposed to modern long-life synthetic formulations.
- Kit completeness: Comprehensive kits that include all seals, gaskets, and bearings together are more cost-effective and ensure that all components are from the same manufacturing batch, which reduces variation in tolerances.
Post-Repair Break-In and Verification
After completing the repair, refill the engine with the correct grade and quantity of fresh oil. Before starting the engine, crank it for several seconds with the ignition disabled (fuel pump fuse removed) to pre-prime the oil system and lubricate the new bearings before the first combustion event.
Start the engine and allow it to idle. Check for oil leaks immediately around all repair areas. Monitor the oil pressure gauge or warning light during the first several minutes. Oil pressure should build within 5–10 seconds of startup. If the oil pressure warning remains on after 15 seconds, shut the engine off immediately and investigate before proceeding.
Allow the engine to reach operating temperature and then inspect all seals and gasket joints once more after shutdown. A small amount of initial weeping at a fresh gasket joint may stop on its own as the gasket fully conforms to the surface. However, any continuous drip or seeping seal requires immediate attention.
For engines with new main bearings, observe a 500–1,000 km (300–600 mile) break-in period during which you avoid sustained high-RPM operation and allow the bearing surfaces to wear in gradually against the crankshaft journals. Change the oil at the end of this break-in period to remove any fine metallic particles generated during the bedding process.
When to Replace vs. Rebuild the Crankcase
A crankcase repair kit is highly effective for addressing wear and leaks in an otherwise structurally sound crankcase. However, there are situations where a repair kit alone is not sufficient and more extensive action is required:
- Cracked crankcase housing: Cracks in the main bearing bore area or crankcase walls compromise structural integrity. Welding is possible on some cast iron crankcases but is generally not recommended for aluminum housings due to the risk of warpage. Replacement is typically more reliable.
- Severely worn or out-of-round main bearing bores: If the bores that hold the main bearings are themselves worn beyond specification, new bearings will not seat concentrically regardless of their quality. This requires line boring at a machine shop.
- Damaged seal housing bores: Corrosion or scoring inside a seal bore prevents a new seal from forming a reliable interference fit. In some cases, a sleeve insert can be installed to restore the bore diameter.
- High mileage with multiple worn systems: If the crankcase repair is only one of several simultaneous failures — including worn cylinder walls, damaged pistons, and excessive camshaft wear — a full engine rebuild or replacement is more economical than sequential partial repairs.
As a general benchmark, a targeted crankcase repair using a quality kit typically costs 60–80% less than a full engine replacement, making it the preferred first option when the crankcase housing itself is structurally intact.
Maintenance Tips to Extend the Life of Your Repair
A properly executed crankcase repair can last the remaining life of the engine if basic maintenance practices are followed. These habits protect the new seals, bearings, and gaskets from premature degradation:
- Change engine oil and filter at the manufacturer's recommended interval. Degraded oil loses its viscosity and lubricating properties, accelerating bearing wear significantly. Most modern engines require oil changes every 8,000–15,000 km depending on oil type and operating conditions.
- Check the crankcase ventilation (PCV) system regularly. A blocked PCV valve causes crankcase pressure to build and forces oil past seals and gaskets, even new ones. PCV valves are inexpensive to replace and should be checked every 30,000 km.
- Monitor oil level weekly for the first month after repair. A gradual drop in oil level without visible external leaks may indicate internal oil consumption or a seal that is not fully bedded in.
- Avoid cold-start high-RPM operation. Oil viscosity is highest at low temperatures and takes 2–3 minutes of idle to fully circulate. Revving a cold engine hard places maximum stress on new bearings before they are fully lubricated.
- Use only the oil viscosity grade specified for your engine. Thicker oil does not necessarily protect better — using an oil that is too viscous can starve narrow bearing clearances of adequate flow, particularly in cold climates.


